Because cells are contained within worksheets, the worksheet object is the parent object of the cell object. The worksheet object is an abstraction and simulation of real-world office scenario worksheets. Using the properties and methods provided by the worksheet object, you can control and operate worksheets programmatically.
Creating and Referencing Worksheets
Use the add(Add) method of the collection object to create a new worksheet. If using Python xlwings, use the add method of the sheets object to create; if using Excel VBA and Python xlwings API, use the Add method of the Worksheets or Sheets object to create.
The newly created worksheet is automatically stored in the collection. According to the order of storage, each worksheet has an index number. When operating on a specific worksheet in the collection, you first need to find it from the collection—this lookup operation is called worksheet referencing. You can reference by index number or worksheet name.
1. Python xlwings Way
You can use the add method of the sheets object to create a worksheet. The syntax is as follows:
bk.sheets.add(name=None, before=None, after=None)
Where bk represents the specified workbook. The add method has 3 parameters:
name: Name of the new worksheet. If not specified, it will be automatically named "Sheet" followed by a number, which increments sequentially based on the addition order.
before: Specify to insert the new worksheet before this worksheet.
after: Specify to insert the new worksheet after this worksheet.
By default, the newly created worksheet becomes the active worksheet.
Below is an example of inserting a new regular worksheet into the bk workbook using the add method without parameters. Note that if using Python xlwings, the newly created worksheet by default is placed at the end of all existing worksheets.
>>> bk.sheets.add()You can use the before and after parameters to specify the position of the new worksheet. Insert the new worksheet sht before the second existing worksheet:
>>> bk.sheets.add(before=bk.sheets(2))Insert the new worksheet sht after the second existing worksheet:
>>> bk.sheets.add(after=bk.sheets(2))The newly created worksheet is automatically stored in the collection, and each worksheet has a unique index number. You can reference worksheets by index number. In Python xlwings, you can use either square brackets or parentheses for referencing. The former uses a base of 0 (i.e., the first worksheet in the collection has an index of 0); the latter uses a base of 1 (i.e., the first worksheet has an index of 1).
>>> bk.sheets
<Sheet [test.xlsx]MySheet>
>>> bk.sheets(1)
<Sheet [test.xlsx]MySheet>
You can also reference by worksheet name:
>>> sht = bk.sheets['Sheet1']
>>> sht.name = 'MySheet'
2. Excel VBA and Python xlwings API Way
You can use the Add method of the Worksheets object to create a new worksheet. The syntax is as follows:
【Excel VBA】
bk.WorkSheets.Add Before, After, Count, Type
【Python xlwings API】
bk.api.WorkSheets.Add(Before, After, Count, Type)
Where bk represents the specified workbook. The Add method has 4 optional parameters:
Before: Specify to insert the new worksheet before this worksheet.
After: Specify to insert the new worksheet after this worksheet.
Count: Number of worksheets to insert.
Type: Type of worksheet to insert.
Thus, if using Python xlwings API, you can specify the worksheet type and insert multiple worksheets at once.
The values of the Type parameter are shown in Table 1-1.
Table 1-1 Values of the Type Parameter
| Name | Value | Description |
|---|---|---|
| xlChart | -4109 | Chart worksheet |
| xlDialogSheet | -4116 | Dialog worksheet |
| xlExcel4IntlMacroSheet | 4 | Excel 4.0 international macro worksheet |
| xlExcel4MacroSheet | 3 | Excel 4.0 macro worksheet |
| xlWorksheet | -4167 | Regular worksheet |
Below is an example of creating a new regular worksheet using the Add method without parameters. The created worksheet is automatically added to the front of all worksheets. However, note that in Python xlwings, it is placed at the end. By default, the new worksheet is named "Sheet" followed by a number (e.g., Sheet2, Sheet3), with numbers starting from 2 and incrementing continuously.
【Excel VBA】
bk.Worksheets.Add
【Python xlwings API】
>>> bk.api.Worksheets.Add()Insert a new worksheet before the second worksheet:
【Excel VBA】
bk.Worksheets.Add Before:=bk.Worksheets(1)
【Python xlwings API】
>>> bk.api.Worksheets.Add(Before=bk.api.Worksheets(1))Insert 3 worksheets at once and place them at the front. Note that among these 3 worksheets, the later-generated one is always inserted at the front.
【Excel VBA】
bk.Worksheets.Add Count:=3
【Python xlwings API】
>>> bk.api.Worksheets.Add(Count=3)Specify the type of the new worksheet to create a new chart worksheet:
【Excel VBA】
bk.Worksheets.Add Type:=xlChart
【Python xlwings API】
>>> bk.api.Worksheets.Add(Type=xw.constants.SheetType.xlChart)You can also combine parameters:
【Excel VBA】 bk.Worksheets.Add Before:=bk.Worksheets(2), Count:=3
【Python xlwings API】
>>> bk.api.Worksheets.Add(Before=bk.api.Worksheets(2), Count=3)After creating a new worksheet, you can modify its name using the Name property of the worksheet object.
【Excel VBA】
Set sht = bk.Worksheets.Add
sht.Name = "MySheet"
【Python xlwings API】
>>> sht = bk.api.Worksheets.Add()
>>> sht.Name = 'MySheet'
You can also use the Add method of the Sheets object to create a new worksheet, with syntax identical to Worksheets.Add.
【Excel VBA】
Set sht = bk.Sheets.Add
Set sht = bk.Sheets.Add Before:=bk.Worksheets(2)
Set sht = bk.Sheets.Add Count:=3
Set sht = bk.Sheets.Add Type:=xlChart
【Python xlwings API】
>>> sht = bk.api.Sheets.Add()
>>> sht = bk.api.Sheets.Add(Before=bk.api.Worksheets(2))
>>> sht = bk.api.Sheets.Add(Count=3)
>>> sht = bk.api.Sheets.Add(Type=xw.constants.SheetType.xlChart)
You can reference worksheets by index number or name:
【Excel VBA】
Set sht = Worksheets(1)
Set sht = Worksheets("Sheet1")
【Python xlwings】
>>> sht = bk.sheets
>>> sht = bk.sheets(1)
>>> sht = bk.sheets('Sheet1')
【Python xlwings API】
>>> sht = bk.api.Worksheets(1)
>>> sht = bk.api.Worksheets('Sheet1')
>>> sht = bk.api.Sheets(1)
>>> sht = bk.api.Sheets('Sheet1')
Activating, Copying, Moving, and Deleting Worksheets
Use the Activate(activate) method or Select(select) method of the worksheet object to activate a specified worksheet. The activated worksheet becomes the active worksheet.
If using Python xlwings, use the activate or select method of the worksheet object to activate the second worksheet; if using Excel VBA and Python xlwings API, use the Activate or Select method of the worksheet object.
【Excel VBA】
bk.Worksheets(2).Activate
bk.Worksheets(2).Select
【Python xlwings】
>>> bk.sheets[1].activate()
>>> bk.sheets[1].select()
【Python xlwings API】
>>> bk.api.Worksheets(2).Activate()
>>> bk.api.Worksheets(2).Select()
After activation, it becomes the active worksheet of the current workbook. If using Python xlwings, use the active property of the sheets object to get the current active worksheet; if using Excel VBA and Python xlwings API, use ActiveSheet to reference the active worksheet. Note that in Excel VBA, you reference the ActiveSheet property of the Application object; in Python xlwings API, you use the ActiveSheet property of the workbook object.
【Excel VBA】
ActiveSheet.Name ' 'Sheet1'【Python xlwings API】
>>> bk.sheets.active.name
'Sheet1'
Copying Worksheets
If using Excel VBA and Python xlwings API, use the Copy method.
Using the Copy method without parameters copies a worksheet and opens it in a new workbook.
【Excel VBA】
bk.Sheets("Sheet1").Copy【Python xlwings API】
>>> bk.api.Sheets('Sheet1').Copy()You can also specify position parameters when using the Copy method to determine where to place the new worksheet before or after a specified worksheet. Note that parameter names are case-sensitive.
【Excel VBA】
bk.Sheets("Sheet1").Copy Before:=bk.Sheets("Sheet2")
bk.Sheets("Sheet1").Copy After:=bk.Sheets("Sheet2")
【Python xlwings API】
>>> bk.api.Sheets('Sheet1').Copy(Before=bk.api.Sheets('Sheet2'))
>>> bk.api.Sheets('Sheet1').Copy(After=bk.api.Sheets('Sheet2'))
Cross-workbook copying is supported. Assume bk2 is another workbook—copy the first worksheet of the current workbook bk before or after the second worksheet of bk2.
【Excel VBA】
bk.Sheets("Sheet1").Copy Before:=bk2.Sheets("Sheet2")
bk.Sheets("Sheet1").Copy After:=bk2.Sheets("Sheet2")
【Python xlwings API】
>>> bk.api.Sheets('Sheet1').Copy(Before=bk2.api.Sheets('Sheet2'))
>>> bk.api.Sheets('Sheet1').Copy(After=bk2.api.Sheets('Sheet2'))
Moving Worksheets
Moving worksheets is similar to copying—use the Move method of the worksheet.
Using the Move method without parameters creates a new workbook and moves the specified worksheet to open in it.
【Excel VBA】
bk.Sheets("Sheet1").Move【Python xlwings API】
>>> bk.api.Sheets('Sheet1').Move()You can also specify position parameters to move the worksheet before or after a specified worksheet.
【Excel VBA】
bk.Sheets("Sheet1").Move Before:=bk.Sheets("Sheet3")
bk.Sheets("Sheet1").Move After:=bk.Sheets("Sheet3")
【Python xlwings API】
>>> bk.api.Sheets('Sheet1').Move(Before=bk.api.Sheets('Sheet3'))
>>> bk.api.Sheets('Sheet1').Move(After=bk.api.Sheets('Sheet3'))
Cross-workbook moving is supported—specify the target workbook object when assigning position parameters.
【Excel VBA】
bk.Sheets("Sheet1").Move Before:=bk2.Sheets("Sheet2")【Python xlwings API】
>>> bk.api.Sheets('Sheet1').Move(Before=bk2.api.Sheets('Sheet2'))You can move multiple worksheets at once using a list. For example, move worksheets Sheet2 and Sheet3 before Sheet1:
【Excel VBA】
bk.Sheets(["Sheet2", "Sheet3"]).Move Before:=bk.Sheets(1)【Python xlwings API】
>>> bk.api.Sheets(['Sheet2', 'Sheet3']).Move(Before=bk.api.Sheets(1))Deleting Worksheets
Use the Delete(delete) method of the Sheets(sheets) object to delete worksheets. You can delete multiple worksheets at once using a list.
【Excel VBA】
bk.Sheets("Sheet1").Delete
bk.Sheets(["Sheet2", "Sheet3"]).Delete
【Python xlwings】
>>> bk.sheets('Sheet1').delete()
>>> bk.sheets(['Sheet2', 'Sheet3']).delete()
【Python xlwings API】
>>> bk.api.Sheets('Sheet1').Delete()
>>> bk.api.Sheets(['Sheet2', 'Sheet3']).Delete()
Hiding and Showing Worksheets
Set the visible(Visible) property of the worksheet object to hide or show a worksheet.
In Python xlwings, setting the visible property of the worksheet object to False or 0 hides the worksheet; setting it to True or 1 shows it. Below is an example of hiding worksheet Sheet1 in workbook bk:
>>> bk.sheets("Sheet1").visible = False
>>> bk.sheets("Sheet1").visible = 0
In Excel VBA and Python xlwings API, use the Visible property of the worksheet object to show or hide worksheets. The following 3 lines of code have the same effect—hiding worksheet Sheet1 in workbook bk:
【Excel VBA】
bk.Sheets("Sheet1").Visible = False
bk.Sheets("Sheet1").Visible = xlSheetHidden
bk.Sheets("Sheet1").Visible = 0
【Python xlwings API】
>>> bk.api.Sheets('Sheet1').Visible = False
>>> bk.api.Sheets('Sheet1').Visible = xw.constants.SheetVisibility.xlSheetHidden
>>> bk.api.Sheets('Sheet1').Visible = 0
Worksheets hidden in this way can be found in the dialog box opened by selecting the "Unhide" command in Figure 1-2—selecting them cancels the hiding.
In Excel VBA and Python xlwings API, there is also "deep hiding." Deep-hidden worksheets cannot be unhidden via the menu; they can only be set or canceled via the property window or code. Use the following code for deep hiding:
【Excel VBA】
bk.Sheets("Sheet1").Visible = xlSheetVeryHidden
bk.Sheets("Sheet1").Visible = 2
【Python xlwings API】
>>> bk.api.Sheets('Sheet1').Visible = xw.constants.SheetVisibility.xlSheetVeryHidden
>>> bk.api.Sheets('Sheet1').Visible = 2
Regardless of the hiding method, you can use any of the following lines to show the worksheet:
【Excel VBA】
bk.Sheets("Sheet1").Visible = True
bk.Sheets("Sheet1").Visible = xlSheetVisible
bk.Sheets("Sheet1").Visible = 1
bk.Sheets("Sheet1").Visible = -1
【Python xlwings】
>>> bk.sheets('Sheet1').visible = True
>>> bk.sheets('Sheet1').visible = 1
【Python xlwings API】
>>> bk.api.Sheets('Sheet1').Visible = True
>>> bk.api.Sheets('Sheet1').Visible = xw.constants.SheetVisibility.xlSheetVisible
>>> bk.api.Sheets('Sheet1').Visible = 1
>>> bk.api.Sheets('Sheet1').Visible = -1
Selecting Rows and Columns
Selecting a Single Row
First, reference the single row, then use the Select(select) method to select it. Below is an example of selecting the first row:
【Excel VBA】
sht.Rows(1).Select
sht.Range("1:1").Select
sht.Range("A1").EntireRow.Select
【Python xlwings】
>>> sht['1:1'].select()【Python xlwings API】
>>> sht.api.Rows(1).Select()
>>> sht.api.Range('1:1').Select()
>>> sht.api.Range('a1').EntireRow.Select()
Selecting Multiple Rows
First, reference the multiple rows, then use the Select(select) method. Below is an example of selecting rows 1–5:
【Excel VBA】
sht.Rows("1:5").Select
sht.Range("1:5").Select
sht.Range("A1:A5").EntireRow.Select
【Python xlwings】
>>> sht['1:5'].select()
>>> sht[0:5,:].select()
【Python xlwings API】
>>> sht.api.Rows('1:5').Select()
>>> sht.api.Range('1:5').Select()
>>> sht.api.Range('A1:A5').EntireRow.Select()
Selecting Non-Contiguous Rows
First, reference the non-contiguous rows, then use the Select(select) method. Below is an example of selecting rows 1–5 and 7–10:
【Excel VBA】
sht.Range("1:5,7:10").Select【Python xlwings】
>>> sht.range('1:5,7:10').select()【Python xlwings API】
>>> sht.api.Range('1:5,7:10').Select()Selecting a Single Column
First, reference the single column, then use the Select(select) method. Below is an example of selecting the first column:
【Excel VBA】
sht.Columns(1).Select
sht.Columns("A").Select
sht.Range("A:A").Select
sht.Range("A1").EntireColumn.Select
【Python xlwings】
>>> sht.range('A:A').select()【Python xlwings API】
>>> sht.api.Columns(1).Select()
>>> sht.api.Columns('A').Select()
>>> sht.api.Range('A:A').Select()
>>> sht.api.Range('A1').EntireColumn.Select()
Selecting Multiple Columns
First, reference the multiple columns, then use the Select(select) method. Below is an example of selecting columns B and C:
【Excel VBA】
sht.Columns("B:C").Select
sht.Range("B:C").Select
sht.Range("B1:C2").EntireColumn.Select
【Python xlwings】
>>> sht.range('B:C').select()
>>> sht[:,1:3].select()
【Python xlwings API】
>>> sht.api.Columns('B:C').Select()
>>> sht.api.Range('B:C').Select()
>>> sht.api.Range('B1:C2').EntireColumn.Select()
Selecting Non-Contiguous Columns
First, reference the non-contiguous columns, then use the Select(select) method. Below is an example of selecting columns C–E and G–I:
【Excel VBA】
sht.Range("C:E,G:I").Select【Python xlwings】
>>> sht.range('C:E,G:I').select()【Python xlwings API】
>>> sht.api.Range('C:E,G:I').Select()Copying/Cutting Rows and Columns
In Excel VBA and Python xlwings API, after referencing rows and columns, use the Copy and Cut methods of the cell object to copy and cut rows and columns.
Copying
First, use the Copy method to copy source data to the clipboard, select the target position, then use the Paste method of the worksheet object to paste. Below is an example of copying the content of row 2 to row 7:
【Excel VBA】
sht.Rows("2:2").Copy
sht.Range("A7").Select
sht.Paste
【Python xlwings API】
>>> sht.api.Rows('2:2').Copy()
>>> sht.api.Range('A7').Select()
>>> sht.api.Paste()
Cutting
First, use the Cut method to cut source data to the clipboard, select the target position, then use the Paste method of the worksheet object to paste. The difference between cutting and copying is that cutting clears the source data, while copying does not. Cutting is equivalent to moving. Below is an example of cutting the content of row 2 to row 7:
【Excel VBA】
sht.Rows("2:2").Cut
sht.Range("A7").Select
sht.Paste
【Python xlwings API】
>>> sht.api.Rows('2:2').Cut()
>>> sht.api.Range('A7').Select()
>>> sht.api.Paste()
You can also cut multiple rows at once. First, select multiple rows, then use the Cut method of the Selection object. Note that Excel VBA and Python xlwings API obtain the Selection object differently. Below is an example of cutting rows 2 and 3 to rows 7 and 8:
【Excel VBA】
sht.Rows("2:3").Select
Selection.Cut
sht.Range("A7").Select
sht.Paste
【Python xlwings API】
>>> sht.api.Rows('2:3').Select()
>>> bk.selection.api.Cut()
>>> sht.api.Range('A7').Select()
>>> sht.api.Paste()
Copying/Cutting Columns
Copying and cutting columns are similar to rows—only the reference is for columns. Below is an example of copying column A to column E:
【Excel VBA】
sht.Columns("A:A").Copy
sht.Range("E1").Select
sht.Paste
【Python xlwings API】
>>> sht.api.Columns('A:A').Copy()
>>> sht.api.Range('E1').Select()
>>> sht.api.Paste()
Cut column 1 to column 5:
【Excel VBA】
sht.Columns("A:A").Cut
sht.Range("E1").Select
sht.Paste
【Python xlwings API】
>>> sht.api.Columns('A:A').Cut()
>>> sht.api.Range('E1').Select()
>>> sht.api.Paste()
Cut columns B and C to columns F and G:
【Excel VBA】
sht.Columns("B:C").Select
Selection.Cut
sht.Range("F1").Select
sht.Paste
【Python xlwings API】
>>> sht.api.Columns('B:C').Select()
>>> bk.selection.api.Cut()
>>> sht.api.Range('F1').Select()
>>> sht.api.Paste()
Inserting Rows and Columns
Use the Insert(insert) method of the cell object to insert rows or columns after referencing them. For the worksheet data shown in Figure 1-4, set the format of row 2: set the background color of cell A2 to green, C2 to blue, and E2 to red. Insert a row above row 3 and copy the format of row 2. The code is as follows:
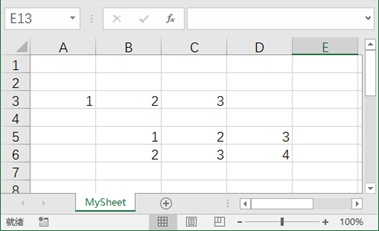
Figure 1-4
【Excel VBA】
sht.Range("A2").Interior.Color = RGB(0, 255, 0)
sht.Range("C2").Interior.Color = RGB(0, 0, 255)
sht.Range("E2").Interior.Color = RGB(255, 0, 0)
sht.Rows(3).Insert Shift:=xlShiftDown, CopyOrigin:=xlFormatFromLeftOrAbove
【Python xlwings】
>>> sht.range('A2').color = (0, 255, 0)
>>> sht.range('C2').color = (0, 0, 255)
>>> sht.range('E2').color = (255, 0, 0)
>>> sht['3:3'].insert(shift='down', copy_origin='format_from_left_or_above')
【Python xlwings API】
>>> sht.api.Range('A2').Interior.Color = xw.utils.rgb_to_int((0, 255, 0))
>>> sht.api.Range('C2').Interior.Color = xw.utils.rgb_to_int((0, 0, 255))
>>> sht.api.Range('E2').Interior.Color = xw.utils.rgb_to_int((255, 0, 0))
>>> sht.api.Rows(3).Insert(Shift=xw.constants.InsertShiftDirection.xlShiftDown, CopyOrigin=xw.constants.InsertFormatOrigin.xlFormatFromLeftOrAbove)
The effect after defining row 2's format and inserting a row above row 3 is shown in Figure 1-5. The inserted row 3 copies the format of row 2, and the original row and data below shift downward.
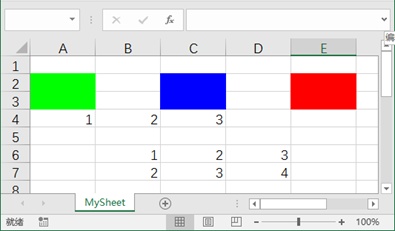
Figure 1-5
You can use loops to insert multiple rows continuously. Below is an example of inserting 4 blank rows above row 3:
【Excel VBA】
For intI = 0 To 3
    sht.Rows(3).Insert
Next
【Python xlwings API】
>>> for i in range(4):
... sht.api.Rows(3).Insert()
Below is an example of selecting a row in the active worksheet and inserting a blank row above it:
【Excel VBA】
ActiveSheet.Rows(Selection.Row).Insert
【Python xlwings API】
>>> bk.sheets.active.api.Rows(bk.selection.row).Insert()In practice, it is often necessary to traverse multiple rows, find rows that meet certain conditions, and insert a blank row above them. Below is an example of traversing column 3 of worksheet sht, finding cells with value 2, and inserting a row above the row containing them:
【Excel VBA】
For intI = 10 To 2 Step -1
    If ActiveSheet.Cells(intI, 2).Value = 2 Then
        ActiveSheet.Cells(intI, 2).EntireRow.Insert
    End If
Next
【Python xlwings API】
>>> for i in range(10, 2, -1):
... if sht.cells(i, 3).value == 2:
... sht.api.Cells(i, 3).EntireRow.Insert()
Inserting columns is basically the same as inserting rows—only the reference method for the area and the parameter settings of the Insert(insert) method differ.
【Excel VBA】
sht.Columns(2).Insert
【Python xlwings】
>>> sht['B:B'].insert()【Python xlwings API】
>>> sht.api.Columns(2).Insert()You can use loops to insert multiple columns continuously:
【Excel VBA】
For intI = 1 To 2
    ActiveSheet.Cells(1, 2).Select
    Selection.EntireColumn.Insert
Next
【Python xlwings API】
>>> for i in range(1, 3):
... sht.cells(1, 2).select()
... bk.selection.api.EntireColumn.Insert()
You can insert columns at intervals using loops by setting the step size of the loop counter variable to 2, or by referencing columns at intervals in the loop body. Below is an example using the second method:
【Excel VBA】
For intI = 1 To 8
    ActiveSheet.Cells(1, 2 * intI).Select
    Selection.EntireColumn.Insert
Next
【Python xlwings API】
>>> for i in range(1, 9):
... sht.cells(1, 2 * i).select()
... bk.selection.api.EntireColumn.Insert()
Deleting Rows and Columns
After referencing rows or columns, use the Delete(delete) method of the worksheet object to delete them.
1. Deleting Single Rows/Single Columns/Multiple Rows/Multiple Columns/Non-Contiguous Rows and Columns
The reference methods for deleting single rows/single columns, multiple rows/multiple columns, and non-contiguous rows and columns are the same as those for selection (Section 1.4.5)—replace the Select(select) method with the Delete(delete) method. This section will not elaborate further.
2. Deleting Empty Rows
There are multiple ways to delete empty rows. Two methods are introduced below:
Method 1: Use the SpecialCells method introduced in Section 1.5.7 to find empty cells, then delete the rows containing them.
【Excel VBA】
sht.Columns("A:A").SpecialCells(xlCellTypeBlanks).EntireRow.Delete
【Python xlwings API】
>>> sht.api.Columns('A:A').SpecialCells(xw.constants.CellType.xlCellTypeBlanks).EntireRow.Delete()Method 2: Use worksheet functions—this requires the Application object introduced in Section 1.2.1. Use its WorksheetFunction property to reference the CountA method. The CountA method takes a worksheet row as a parameter and returns 0 for an empty row. Based on this, all empty rows can be deleted.
【Excel VBA】
intRows = ActiveSheet.UsedRange.Rows.Count
For intI = intRows To 1 Step -1
    If Application.WorksheetFunction.CountA(ActiveSheet.Rows(intI)) = 0 Then
        ActiveSheet.Rows(intI).Delete
    End If
Next
【Python xlwings API】
>>> a = sht.used_range.rows.count
>>> for i in range(a, 1, -1):
... if app.api.WorksheetFunction.CountA(sht.api.Rows(i)) == 0:
... sht.api.Rows(i).Delete()
3. Deleting Duplicate Rows
To delete duplicate rows, first identify them. Use the COUNTIF worksheet function to find duplicates. As shown in Figure 1-6, column A contains given data. Enter the formula =COUNTIF($A$1:$A$8,A1) in cell B1 and drag to fill—results are shown in column B. Each value in column B indicates how many times the left-side data is repeated; values greater than 1 indicate duplicates. Based on this, duplicate rows can be identified.
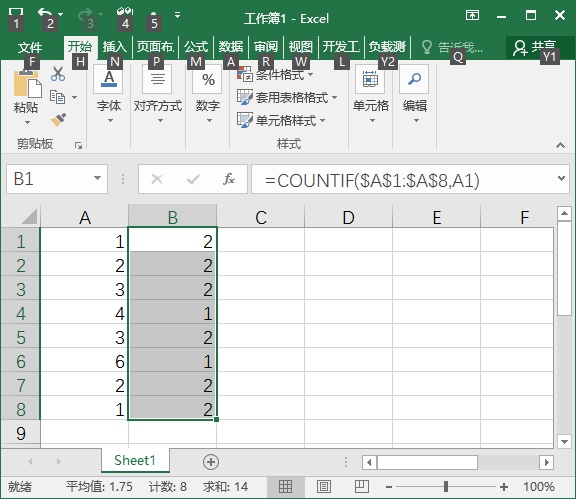
Figure 1-6
Write the following code to judge the data in column A of the worksheet using the COUNTIF function. If the return value is greater than 1, it is a duplicate row and needs to be deleted.
【Excel VBA】
intRows = sht.Cells(sht.Rows.Count, 1).End(xlUp).Row
For intI = intRows To 1 Step -1
    If Application.WorksheetFunction.CountIf(sht.Columns(1), _
        sht.Cells(intI, 1)) > 1 Then
        sht.Rows(intI).Delete
    End If
Next
【Python xlwings API】
>>> a = sht.cells(sht.api.Rows.Count, 1).end('up').row
>>> for i in range(a, 1, -1):
... if app.api.WorksheetFunction.CountIf(sht.api.Columns(1), _
... sht.api.Cells(i, 1)) > 1:
... sht.api.Rows(i).Delete()
Setting Row Height and Column Width
If using Excel VBA and Python xlwings API, use the RowHeight property of the cell object to set and get row height, and the ColumnWidth property to set and get column width (units are points in this section).
Setting Row Height
Below is an example of setting the row height of row 3 to 30, row 5 to 40, and all rows to 30:
【Excel VBA】
sht.Rows(3).RowHeight = 30
sht.Range("C5").EntireRow.RowHeight = 40
sht.Range("C5").RowHeight = 40
sht.Cells.RowHeight = 30
【Python xlwings API】
>>> sht.api.Rows(3).RowHeight = 30
>>> sht.api.Range('C5').EntireRow.RowHeight = 40
>>> sht.api.Range('C5').RowHeight = 40
>>> sht.api.Cells.RowHeight = 30
Setting Column Width
Below is an example of setting the column width of column 2 to 20, column 4 to 15, and all columns to 10:
【Excel VBA】
sht.Columns(2).ColumnWidth = 20
sht.Range("C4").ColumnWidth = 15
sht.Range("C4").EntireColumn.ColumnWidth = 15
sht.Cells.ColumnWidth = 10
【Python xlwings API】
>>> sht.api.Columns(2).ColumnWidth = 20
>>> sht.api.Range('C4').ColumnWidth = 15
>>> sht.api.Range('C4').EntireColumn.ColumnWidth = 15
>>> sht.api.Cells.ColumnWidth = 10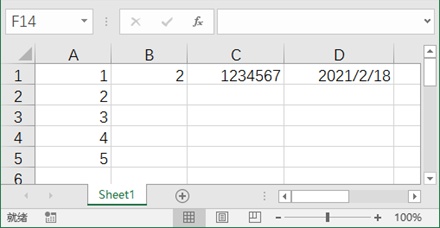
Figure 1-7
Auto-Fitting in Python xlwings
If using Python xlwings, use the autofit method of the worksheet object to automatically adjust the height and width of rows, columns, or both in the entire worksheet. The syntax of the autofit method is as follows:
sht.autofit(axis=None)
Where sht represents the worksheet to be set. When the parameter axis is 'rows' or 'r', rows are auto-fitted; when 'columns' or 'c', columns are auto-fitted. Without parameters, both rows and columns are auto-fitted.
>>> sht.autofit('c')| The effects before and after auto-fitting column widths are shown in Figures 1-7 and 1-8. |
|---|